SAFETY INSPECTION GUIDELINES
Always consult the PACKERS KROMER Balancer Operating Instructions and Assembly Manual
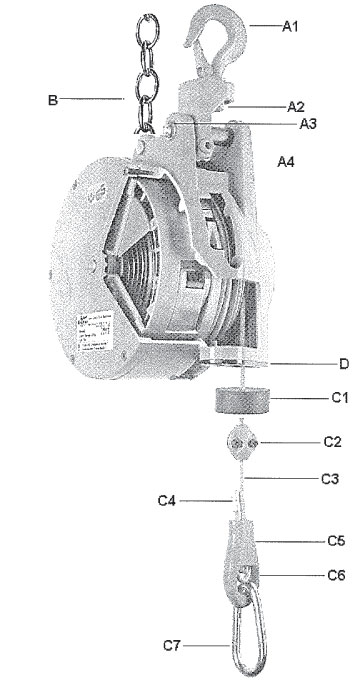
A1 Safety Trigger
The Safety Trigger should be intact and working properly.
A2 Bearing Mount
Check for bearing integrity and security.
A3 Cotter Pins
The Cotter Pins should be intact and secure.
A4 Shackle Clamp Screw
Assure tightness.
B Safety Chain
Check for integrity of the chain and the Fall Protection Device, assuring tightness of the mount.
C1 Rubber Cable Stop Buffer
Check for integrity.
C2 Stop Cable Clamp
Check for tightness and cable integrity near the clamp.
C3 Cable Assembly
Check cable for integrity along the normal travel. The cable must not be frayed, kinked, or worn excessively. Insure there are 4 inches between the socket and the cable clamp.
C4 Cable Ferrule
The Cable Ferrule should be intact and crimped tight.
C5 Cable Socket & Wedge
Cable Socket & Wedge
C6 Check to confirm that the wedge is in the correct position within the clamp.
Also check for cable integrity.
C7 Trigger Snap
The Trigger Snap should not be worn excessively at the tool attachment point. Replace immediately if worn. Trigger Snap must be intact and working properly.
D Nylon Nozzle
Inspect for pronounced grooving Replace if worn.
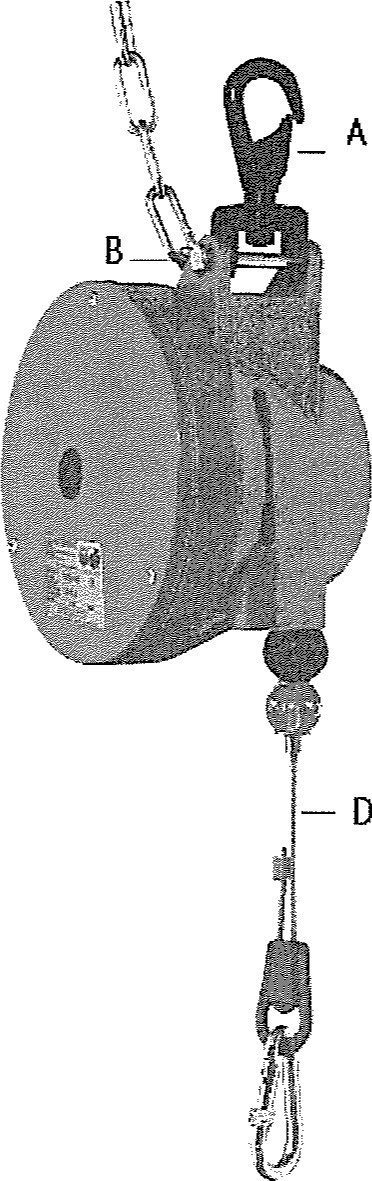
A. Inspect the hanging suspension for latch integrity.
Replace the suspension if the latch does not snap closed when released. Verify that the cotter pin on the swivel pin is not damaged and is secure. Swivel and rotate the suspension and spray oil into the bearing if necessary. Inspect the -c point of contact between the hook and the attachment point for wear. If excessive metal loss has occurred, replace the suspension.
B. Verify that both ends of the safety chain are attached properly
Inspect the shackle to verify that the nut and cotter pin are tight and in working order. Inspect each link of the chain and replace if any damage is visible.
C. Inspect the housing for damage at all connecting points and around the nozzle.
Any observable damage requires replacement.
D. Extend the cable to the end of its travel and inspect for wear, fraying, burrs or damage and replace it if any is found.
Lubricate the cable with acid free grease. 7230 Insure the cable clamp is tight, and in the correct position to prevent overloading the drum. Insure that the free side of the cable has the cable fenule installed and inspect the lower hook for wear or damage. Insure that the lower locking hook is tightly screwed shut.
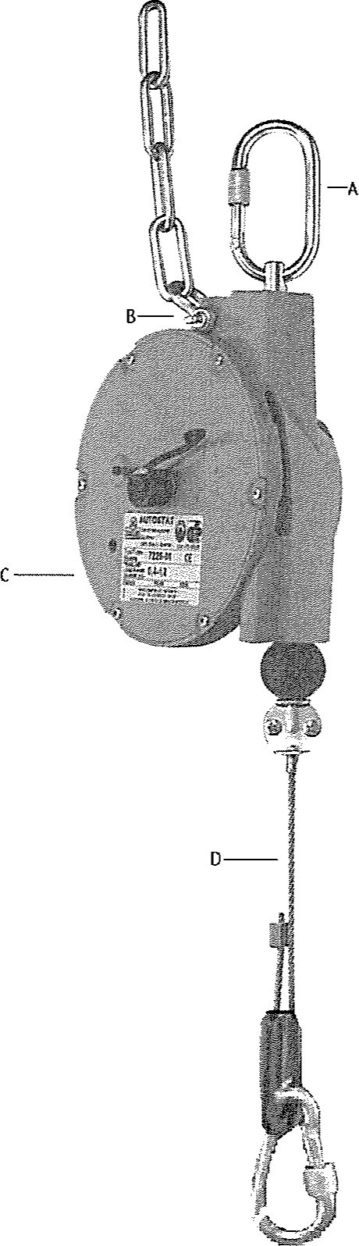
A. Remove the hanging suspension and inspect the locking trigger snap hook for wear.
Attention should be paid to both the top and bottom of the hook where there is metal to metal contact. Any sign of deformity or loss of metal requires replacement. Inspect the hanger pin for wear at the point it has contact with the top hook. The locking mechanism on the top hook should be tightened to prevent the possibility of opening.
B. Inspect the shackle to verify that the nut and cotter pin are tight and in working order.
Inspect the attachment device on the safety chain to insure it is tight and replace it if there are any signs of wear.
C. Inspect the housing
Replace it, if any damage is visible.
D. Extend the cable to the end of its travel and inspect for any wear, fraying, or damage and replace the assembly if any excess wear is found.
Lubricate the cable with acid free grease. Insure the cable clamp is tight, and in the correct position to prevent overloading the drum. Insure that the free side of the cable has the cable ferrule installed, and inspect the lower hook for wear or damage. Insure that the lower locking hook is tightly secured.